|
Today's tech tip is a quick and easy way to save paper and ink. How often have you been online and wanted to print something, but you aren't sure how to get rid of the ads on the sides of the screen? Well, now there is a tool to help you! Print Friendly is a free online tool that helps you erase ads, pictures, and other elements you do not want to print. Check out the video below for more information: The best browser for Print Friendly is Google Chrome. You can also download an extension for Print Friendly that works with Chrome. An extension is like an app that is integrated into the Chrome browser. It will add a green icon in your Chrome toolbar so you can easily use Print Friendly without needing to go to the website and copy/paste a URL.
So now, if you absolutely must print, you can save paper and ink by removing all the unwanted ads and images not applicable to what you are reading. Have other ways you save paper and ink? Please feel free to share in the comments below. Many educators today are doing their best to move away from the traditional lecture format in their classrooms. This shift is a positive one in order to support student-centered learning. However, there are still times when it is necessary to focus the attention back to the front of the room, whether for a video or a traditional lecture. How do we make sure our students are still engaged even when they are asked to sit and listen? You can create a backchannel in your classroom to ensure their engagement and regularly monitor their formative learning. Creating a backchannel is easy using educational technology. There are a number of tools you can use to create a backchannel, and I offer links to a handful below. So, really, why use a backchannel? Won't that just distract my students? Well, no. Your students are already using a backchannel in your classrooms, whether it is whispering, texting, passing notes, or even jumping on social media. So why not offer them a structured backchannel to refocus the conversation on the content information and give them productive ways to collaborate? Backchannels offer ways to have a more organic conversation with your students. Instead of having students raise their hand and interrupt lecture, they can type their questions in the backchannel. The conversation becomes more relevant and happens more organically. The answers to the questions also become more relevant because you can encourage students to collaborate and help each other out by answering other students' questions. This takes some of the work load off the instructor and puts the onus of learning back on the students, where it really should be anyway. You can use a backchannel on most devices that connect to the Internet, so you can encourage your students to bring their own devices or technology (BYOD/BYOT). As a secondary form of classroom communication, the backchannel is a way for the instructor and other students to clarify and collaborate simultaneously with class instruction. Students are constantly engaged and encouraged to take part in an active discussion. It gives students different options for their voices to be heard. Backchannels are a great use of formative assessment because the instructor is able to immediately see if students understand the content, or if it is necessary to go back over material that students don't seem to understand. Students can also go back to the backchannel after class and use that conversation as part of their class notes, providing another way for them to review the content material. Finally, if you are flipping your classroom, you can create a backchannel that is used asynchronously by your students to continue the conversation. Students are encouraged to challenge one another and answer each other's questions. The instructor can jump in when necessary to clarify any misunderstandings, but the learning and active discussion really falls to the students. Below is a list of popular tools you can use to create a backchannel in your classroom. Many of these tools allow the instructor to monitor and delete responses in real time, allow for class privacy, and can easily be shared as links for the students to access. You can click on the links below and explore each tool individually to get an idea of what would work the best for you and your students.
So how do you use backchannels in your classroom? Please leave a comment and let us know! What does discussion look like in your classroom? Do you normally see one student dominating the conversation? Do you have other students who are too shy to join in the conversation for fear of being wrong? Often our classroom discussions can be lopsided due to dominant students or even derailed by students introducing an off-topic to the mix. We want all of our students to be engaged and feel empowered to join in a class discussion. We also want to give students time to think in order to provide deeper answers. Verso can help you create dynamic class discussions by offering a safe, anonymous space for all students' voices to be heard and valued. Overview of Verso:
While student responses are kept anonymous, the instructor can see everything on their own dashboard, including who is typing and commenting. The instructor also has the ability to remove any inappropriate responses immediately. Students can also flag inappropriate comments and responses. For more information on using Verso, please watch the video below: Want more resources? Check out the links below! Also, be sure to leave a comment on how you use or plan to use Verso. Now, go get started with Verso! We all want to find different ways to get our students to reflect on their learning. One way to do this is to have students do a quickwrite. You can use this type of assignment as a weekly, in-class exercise, or you can ask students to do this in preparation for class. The quickwrite is designed to encourage students to reflect on the week's content and revisit their notes to review what they learned. It is a way to ask questions about course concepts without having to do a review in class. Quickwrite also helps the instructor to identify areas of review; for instance, if many students mention they are still confused about a concept, the instructor can follow up with review immediately instead of waiting to see students miss certain content questions on the exam.
Here are five questions you can use in a quickwrite assignment, though feel free to create your own as well:
When giving instructions about the quickwrite, be sure to point out that students should focus on the content information and not the operation of the course (i.e., grading). Also point out students should write in complete sentences and answer each question thoroughly. While they may not have an answer for question #2 (great!), they should definitely have answers for the other questions. You can assign points to each question as a graded assignment, or you could leave it open as a participation and process grade. Choose whatever method makes the most sense for your course and your students. The quickwrite never needs to be a high stakes exercise; instead, it should be a way to ask students to reflect on their learning and give you information on what content needs to be reviewed. The quickwrite can be done on paper, or you can ask your students to do the quickwrite digitally (it all depends on your objectives, but be sure to consider TPACK!). If you choose to go the digital route, you can give students options to complete the assignment. Below are some great tools that your students can use to complete the quickwrite and easily share with you in a digital format:
For more writing ideas, check out this list of writing tools! Want to share how you use quickwrites with your students, please leave a comment below! Happy writing! It’s easy to get confused when you set out to find apps that will best drive student learning. There are, after all, thousands of educational apps available in the iTunes and Google Play stores, and the number is growing weekly. Like many educators, we also felt overwhelmed by the choices. But over the years we developed a process that allows us to sharply define what we need and then find the tools that help us meet our needs. Here are the five steps we consider: 1. Start by defining the problem of practice 2. Address the how of learning 3. Narrow down the type of tools 4. Look for sound advice 5. Evaluate the tools For more information on each of the five steps, read more here. According to the Teaching with Technology survey conducted by Campus Technology (2016), the majority of faculty in higher education are either flipping their classroom or plan to flip their classroom. The flipped classroom is a pedagogical model where traditional lecture and homework are reversed. Many flipped classrooms include short video lectures from the instructor in order to cover content knowledge before students come to class to discuss and practice the content through projects and exercises. The flipped classroom focuses on active, student-centered learning and has shown an increase in student engagement inside and outside the classroom. 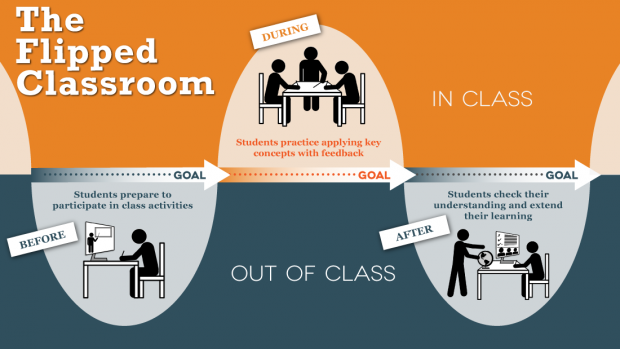 Flipping the classroom allows instructors to offer more interactive and applied practice to help students reach higher level learning. At its core, flipped learning really is a form of blended learning because it incorporates both face-to-face and online elements. Flipped learning can be used to modify learning to best support students' needs and learning interests. Flipping the classroom will be a change for both instructors and students. Instructors will move away from the Sage on the Stage model toward a Guide on the Side model (though carefully considering what that means and not leaving students to fend for themselves, but instead use their sage-ness to help guide student learning). Students will have more choice and responsibility for their learning. The collaborative and cooperative nature of flipped learning can be uncomfortable at first for instructors and students alike, but supporting students in their learning by offering more hands-on practice is worth it when we see students go beyond basic understanding and instead show mastery of content. Resources to ExploreThere is a movement in education right now focused on open educational resources (OER). OER are teaching and learning materials that educators can use and reuse at no cost and without needing to ask permission. OER are authored or created by an organization or individuals that retain few (if any) ownership rights. These materials can be downloaded and used with students or shared with colleagues. In many cases, you can also modify the materials for your own uses and re-post for others to use. The idea behind the OER movement is tied to the basic human right to quality education access. OER Commons is a great resource to discover OER materials, create materials to share with other educators, and connect with educators interested in OER resources. You can use the website to search for ready-made materials or use their module builder to create your own learning modules that you can build with OER materials. Use the links below to start your OER exploration.
 I've been thinking a lot lately about ways we give our students freedom and autonomy in the classroom while also making sure they learn the skills and content we need them to learn to be successful in our classes. Sometimes it takes some classroom Jedi mind tricks to accomplish our goals.
I have a few Jedi mind tricks I use with my students. One of my favorites is assigning mandatory time with me for any incomplete assignments. Not only do I already hold office hours or have planning time set aside (so, in the end, I'm not losing my own time), but this gives students time and space to come get help. It also helps me build relationships with students who may be struggling in my classes. Another example I use is allowing mastery on assignments. I'll allow students to do an assignment as many times as they want until they achieve their desired grade. For some that might be an A, for others a B, and so on. I do give time limits on this process, however, because I do not want students trying to rewrite or redo assignments at the eleventh hour at the end of the semester. That would overwhelm me. But, ultimately, I want my students to master the content, and giving them as many times as they need to show their learning on an assignment benefits them. There are a number of ways for implementing mastery learning, and this is just one example. You can read more about mastery learning and its origins as well as tips for mastery learning. What kind of Jedi mind tricks do you use with your students? I love this Vitae forum thread with a lot of instructors sharing their tips. Feel free to share yours in the comments below! Whether you are a new teacher in the classroom or a veteran teacher with a lot of knowledge and experience, everyone has their own level of expertise when it comes to using educational technology in the classroom. There is a misconception that newer teachers must have better understanding of technology because they have used it most of their lives. They are often referred to as "digital natives." That perception is not always accurate. In fact, my experience working with teachers shows that while new teachers may have used technology most of their lives, they do not necessarily know how to leverage that tech use in the classroom. Using educational technology is a whole different practice when it comes to the classroom and working with students. Here are a few tips for all teachers when using educational technology:
Most educators are familiar with Bloom's Taxonomy. Proposed and created in 1956 by Benjamin Bloom and a committee of educators, it is a classification of the different objectives and skills students should learn from specific course content. The taxonomy was updated in 2001 by Anderson and Krathwohl to focus on six levels of learning: Remember, Understand, Apply, Analyze, Evaluate, and Create. As you can see below in the first image, Anderson and Krathwohl shifted the taxonomy from nouns to active verbs. 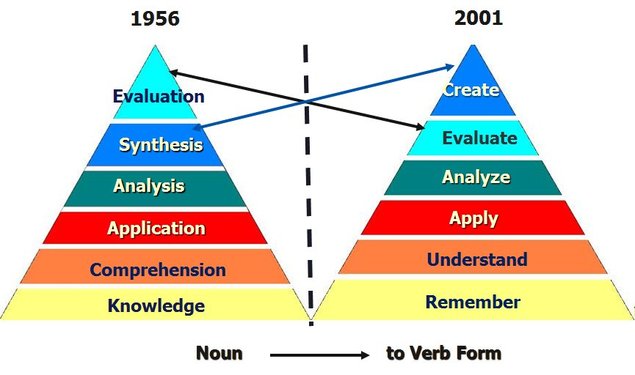 You will often see Bloom's presented as a hierarchical, step approach (either as a pyramid or steps). It is important to note that the learning at the higher levels is dependent on the student having the prerequisite knowledge and skills at the lower levels. So each level can be built on the foundation of the previous levels. However, you can also think of Bloom's functioning at the same time, depending on your learner, your learning context, and your course content. The second image seen below helps educators think of these levels and how they branch out to emphasize and support our different types of learners. Note how each outer circle presents a different way of using the taxonomy levels. You have words that will help you as your write your learning objectives followed by examples of activities you can use as assessments to align to each of your learning objectives. Finally, you have different learning styles connected to all that come in the earlier circles. 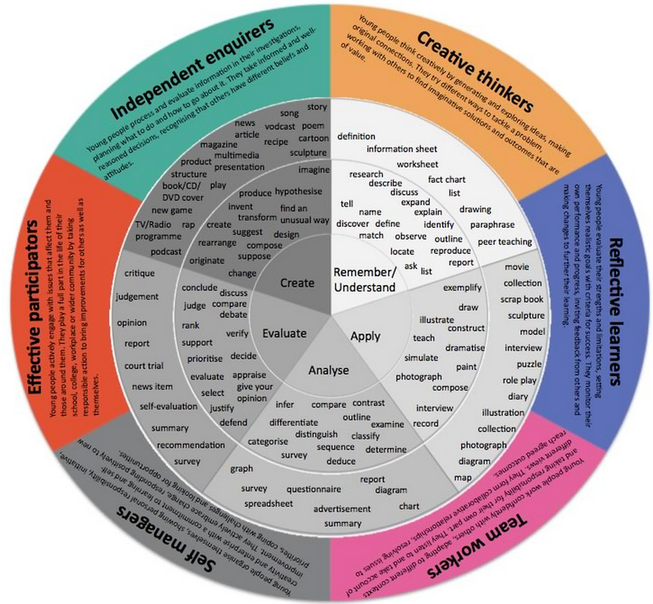 As we extend our knowledge of Bloom's Taxonomy, we should start to think how we can extend our students' understanding and practice. We should emphasize and support 21st century learning in our classrooms. The image seen below helps educators think through digital activities aligned with each level of Bloom's. Note that the activities are simply categories and not specific tools. You have the freedom to choose tools that will support these activities. In fact, ask your students to identify digital tools that would be useful for the activities to increase their buy-in to the learning process. For instance, you (or your students) might choose to use Voicethread as your tool. Voicethread can be used on multiple levels, such as for Understanding, Applying, Analyzing, and Evaluating. It all comes down to what your objective is and what information and/or skill you want your students to learn. 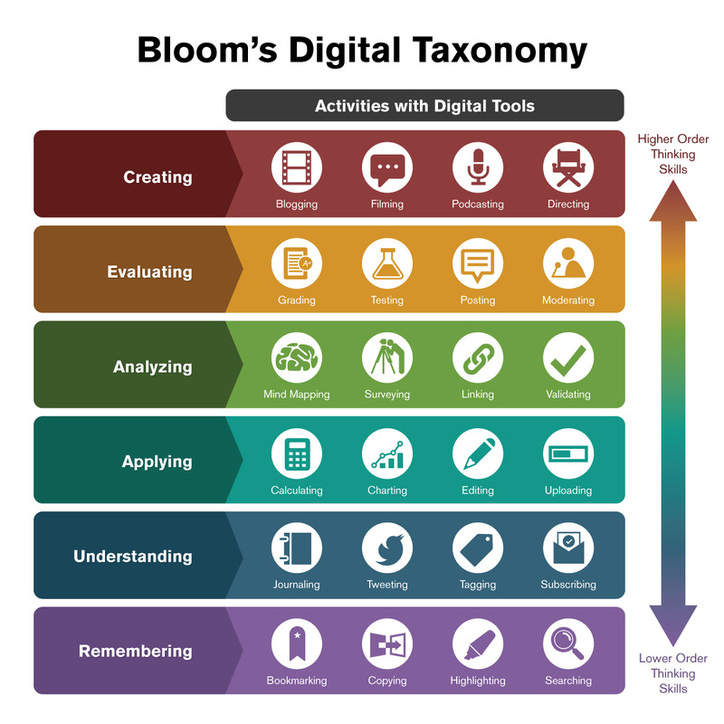 Remember, your course objectives should align with your lesson objectives which, in turn, align with your assessments which then align with your evaluation processes. Each lesson objective should focus on helping your students demonstrate the mastery of your course objectives. The lesson objectives directly support the course objectives, and they all should build up the Bloom's taxonomy to help your students show learning mastery over time. For more resources, check out what the University of Arkansas is doing: Using Bloom’s Taxonomy to Write Effective Learning Objectives Learning Objectives – Examples and Before/After Bloom’s Taxonomy Verb Chart Digital Approaches to Bloom’s Taxonomy Finally, just for fun: Bloom’s Taxonomy According to Seinfeld |
Archives
April 2017
Categories
All
|
 RSS Feed
